In an era where social change often starts with a single voice amplified online, building your own petition platform can empower communities, drive activism, and even spark real-world policy shifts. Platforms like Change.org have proven the power of digital petitions, collecting millions of signatures for causes ranging from environmental justice to human rights. If you’re ready to launch your own site—perhaps for a nonprofit, grassroots movement, or personal campaign—WordPress offers a flexible, user-friendly foundation. In this guide, we’ll walk you through creating an online petition website using the Campoal WordPress theme, a comprehensive solution designed specifically for petition and fundraising platforms. Inspired by top sites like Change.org, Campoal combines sleek design, user submission tools, signature collection, and donation features into one package.

Whether you’re tech-savvy or a beginner, this step-by-step process will get you up and running in no time. Let’s dive in.
Step 1: Register a Domain Name
Your website needs a memorable address to attract visitors. Start by securing a domain name that reflects your mission—something like “JusticeNowPetitions.org” or “EcoVoiceCampaigns.com.”

- Head to Namecheap (a reliable registrar) and use their Domain Name Search tool to check availability for up to 50 variations at once. Apply filters like “Beast Mode” to narrow by price, or get creative with domain hacks (e.g., inter.net for interconnected causes).
- Once you find an available domain, add it to your cart. Premium domains might cost more, but standard ones start cheap. During checkout, configure WHOIS contacts (for privacy, enable WhoisGuard), set nameservers, and choose payment via card, PayPal, or funds.
- Pro tip: Bundle with add-ons like SSL certificates for security right from the start.
After purchase, you’ll receive confirmation—keep the details handy for the next step.
Step 2: Set Up Hosting and Install WordPress
A solid hosting setup ensures your site scales as signatures pour in. We recommend DigitalOcean for its affordability and ease, especially for WordPress beginners.
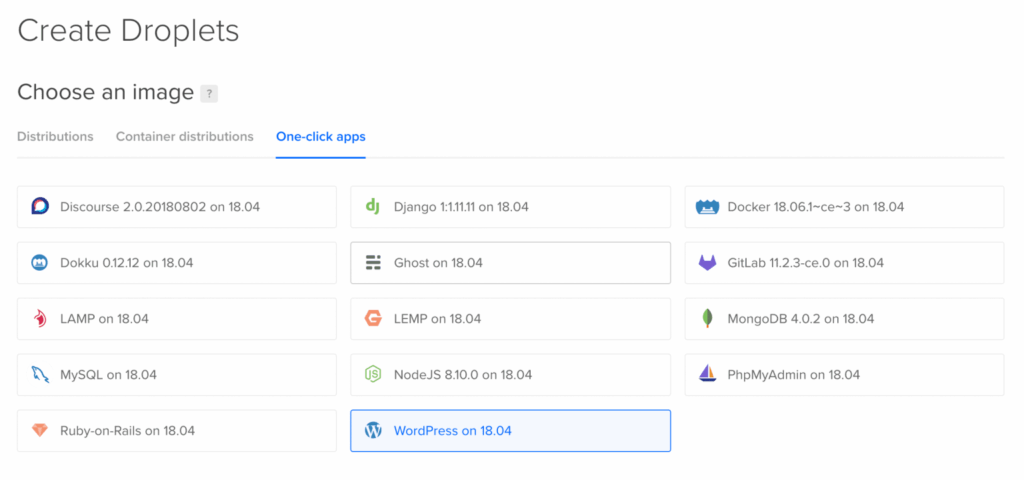
- Sign up for a Droplet (virtual server) starting at $5/month—perfect for handling up to millions of views. Opt for the one-click WordPress on Ubuntu installer to skip manual config.
- Choose your datacenter (e.g., closest to your audience for speed), set a hostname, and add SSH keys if you’re comfortable. Once live, access via SSH as root (reset the password from your email), then visit your Droplet’s IP in a browser to complete WordPress setup: create an admin username, password, and email.
- Point your domain: In DigitalOcean’s Networking tab, add A records (@ for apex domain, www subdomain) linking to your Droplet’s IP.
- Secure it with HTTPS: Run Certbot (
certbot --apache -d yourdomain.com -d www.yourdomain.com) to install a free Let’s Encrypt certificate, then update your WordPress site URL to https://.
For managed hosting without the hassle, consider Cloudways on DigitalOcean. Disable search engine indexing temporarily during setup to avoid premature crawling.
Step 3: Install and Activate the Campoal Theme
Now, bring your site to life with Campoal—the ultimate WordPress theme for petitions. It’s not just a skin; it’s a full-featured platform with built-in tools for user submissions, signatures, and fundraising.
- Purchase Campoal from the official Conikal site (supports Credit Card or PayPal). Download the .zip file immediately.
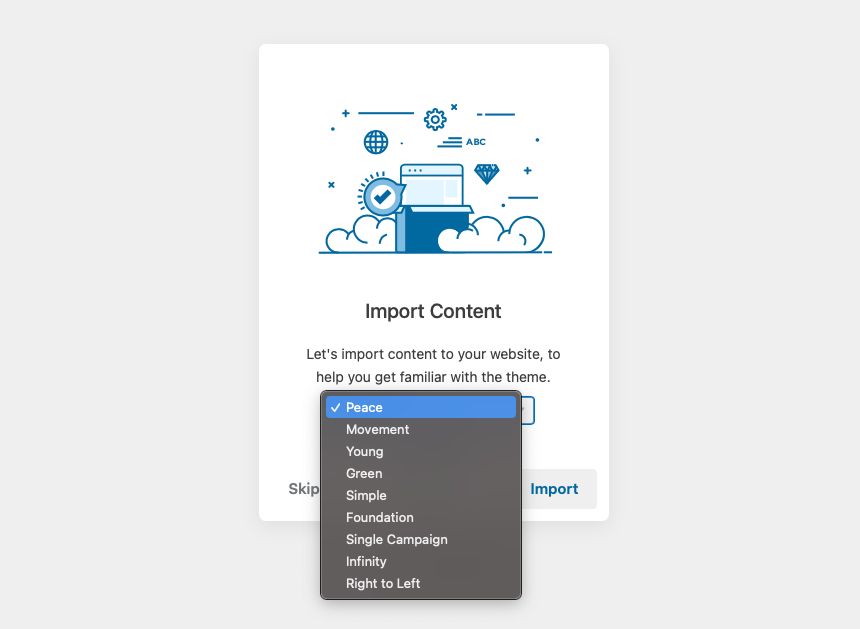
- In your WordPress dashboard, go to Appearance > Themes > Add New > Upload Theme, select the .zip, and install. Activate it to trigger the Setup Wizard.
- Follow the wizard: Install the child theme for safe customizations, add required plugins like Campoal Tapo (essential for core functionality), import a demo layout, and enter your license key from the purchase email for automatic updates.
Campoal’s clean, timeline-style homepage will greet you, ready for campaigns.
Step 4: Customize Your Site with Campoal
Tailor Campoal to match your brand and cause. Access settings via Appearance > Customize for intuitive tweaks—no coding required.
- General Setup: Upload your logo, select your country, set minimum signatures for visibility, and enable features like smooth scrolling or preloaders.
- Homepage Design: Choose header styles, add image captions, and toggle sections like spotlight petitions, victory stories, or call-to-action buttons. Use the bundled WPBakery plugin for drag-and-drop page building, including slideshows or galleries.
- Appearance and Colors: Adjust petitions per page, enable breadcrumbs, pick Google Fonts, and create custom color schemes for a professional vibe.
- Petition Fields and Emails: Require specific fields (e.g., email for verification), customize email templates for notifications, and integrate SendinBlue for lists.
- Fundraising Options: Label donate buttons, set transaction fees, and define withdrawal minimums. Pair with the Give plugin for gateways like Stripe or PayPal.
For advanced users, insert shortcodes (e.g., for petition directories) via the Classic Editor. Test everything on a staging site first.
Step 5: Configure Petitions and Key Features
With the basics in place, set up the petition engine that makes your site interactive.
- User Onboarding: Enable frontend registration and social logins (Facebook/Google—grab App IDs from their developer portals). This prevents spam and builds a community.
- Create Petitions: Guide users through a multi-step form: title/category, target decision-maker/location, problem description/topics, and media upload. Require admin approval or minimum signatures before going live.
- Signing and Engagement: Add a sticky sidebar for quick signs (with reason fields). Signers get email confirmations, and their names appear in the Supporters section. Schedule updates via the dashboard to keep momentum.
- Dashboard Management: Petition starters can edit goals, add co-authors, export signatures (Excel/PDF), and view analytics. Decision-makers can respond directly.
- Search and Discovery: Activate the pro search bar with category filters and auto-suggestions for easy navigation.
Integrate WooCommerce if you want e-commerce for merch, and use Bit.ly for trackable share links.
Step 6: Launch, Promote, and Grow
Your site is ready—now amplify it.
- Go Live: Remove the “noindex” tag, submit to Google Search Console, and announce on social media.
- Promotion Tactics:
- Online: Share with hashtags, email signers updates, comment on related blogs, and cross-post to Change.org. Use the built-in social sharing tools.
- Offline: Collect paper signatures at events, pitch to local media, and combine counts for bigger impact.
- Best Practices: Set realistic goals (e.g., 10K for parliamentary attention in some regions), verify signatures to build credibility, and track success with analytics. Remember, petitions succeed through persistence—only about 10% win, but viral ones can change policies overnight.
Conclusion
Creating an online petition website with Campoal transforms a simple WordPress install into a powerful activism hub. From domain setup to viral campaigns, this guide equips you to collect signatures, raise funds, and drive change. Start small, stay authentic, and watch your community grow. Ready to launch? Grab Campoal today and let your voice echo online. If you hit snags, Conikal’s support has your back. What’s your first petition? Share in the comments!


Campoal - No.1 Petition & Fundraising WordPress Theme
Campoal is a perfect WordPress theme to create the petition platform with fundraising. Where anyone can be start a social movement, collect supporters and raise funds to change something in society.
Related Articles

How to make an online petition?